🙋🏻♂️ Before getting started
Before diving into HubSpot Emails, make sure the basics are set up correctly. The following articles will help you prepare your files, contacts, and email settings:
What you will learn in this article:
-
Step 1: Email Templates
-
Step 2: Email Settings
-
Step 3: Naming Conventions & Structure
-
Step 4: Edit your Newsletter
-
Step 5: Finalize and Send the Email
-
Step 6: Send Newsletter & Test
-
Step 7: Track Performance
Step 1: Email Templates
💌 Email Type
- After selecting the correct folder, click on the “Create email” button in the top right corner.
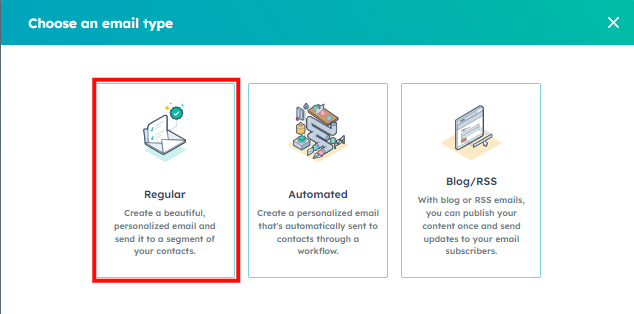
- Choose whether you are creating a “Regular” or “Automated” email.
- Select the appropriate pre-configured template from the Template Library that matches your branding requirements.
🚀 Choose your Template
Accelerate and simplify your newsletter and email creation process with our ready-to-use templates - discover how they work and how to use them effectively.
Step 2: Email Settings
- Change email name by clicking into the title on top.
- Navigate to the Edit Tab
- Adjust local language and any other necessary changes.
- Navigate to the Settings Tab
- Change From name*
- Change From address*
- Add Subject line*
- Add Preview text*
- Change Language*
- Add Subscription type*
Learn more about subscription types here. - Change Office location* (influences the footer of the Mail)
- Select a Campaign (optional)
Learn more about HubSpot Campaigns here. - Switch on the toggle for web version if you wish to do so (optional).
Learn more about the Web version and the naming here.
Step 3: Naming Conventions & Structure
Customize the content within the pre-configured template:
- Change email name by clicking into the title on top. You must follow the global guidelines on how to name your email.
Marketing E-Mail (campaign-related)
Country-Language // YYYY-MM // CATEGORY // Name of Campaign // Internal Name of Email
- CH-EN // 2024 // LEAD // Roadshow // Follow Up
- CH-FR // 2024 // LEAD // Roadshow // Follow Up
- CH-IT // 2024 // LEAD // Roadshow // Follow Up
- CH-DE // 2024 // LEAD // Roadshow // Follow Up
- GLOBAL-EN // 2023-12 // LEAD // Gentle Guide // Download
- UK-EN // 2023-10 // LEAD // Event // Carfest // Follow-Up Email
- DE-DE // 2023-10 // LEAD // Dental Recommendation Vouchers // Mail 1
Marketing E-Mail (not campaign-related > weekly Newsletter)
Country-Language // YYYY-MM // Number of Newsletter in this month // Internal Name of Email
- CH-EN // 2024-03 // 01 // Aligner Foam Launch
- UK-EN // 2024-03 // 01 // Aligner Foam Launch
- IT-IT // 2024-03 // 02 // Ortho for kids
- NL-NL // 2024-03 // 03 // How to brush with braces
Internal Knowledge Base: General Guidelines & Naming structure
Step 4: Edit your Newsletter
Once you're in edit mode, you can begin crafting your newsletter using the template you selected. Think of the template as your starting point — it’s meant to save time, not limit creativity. You can always add, remove, or adjust sections as needed. Keep it simple, make it yours, and focus on clarity.
-
Adapt the Template: Use the selected template as your foundation. Modify existing sections, insert your copy, and add, replace, or remove images as needed.
-
Add New Sections: Navigate to the Sections tab, then simply drag & drop the elements you need. Customize them to fit your content.
💡 Tip: Keep it short and simple. Think like a customer — readers prefer brief, clear emails that are quick to scan. Images can often communicate more effectively than text. Aim for minimalism, reduce friction, and remember: less is more.
Step 5: Finalize and Send the Email
When you are happy with your email and ready for the next step: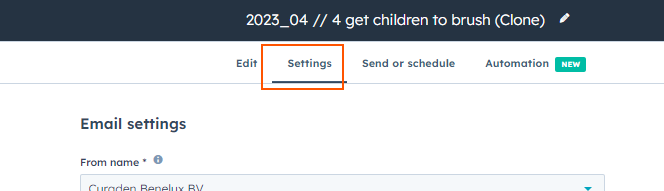
- Go to “Settings” and ensure all details are correct:
- Sender information / Subscription Type

- Subject line
- Language
- Office location (this influences the footer of the email)

-
Optionally / ideally – add a campaign to your Newsletter for better result tracking:

- Don’t forget to save your Newsletter:

- Sender information / Subscription Type
Ensure Plain Text and Web Version Are Set Up
Step 6: Send Newsletter & Test
Before sending your newsletter, it’s important to run tests, review key settings, and choose the right recipients. This section guides you through final checks, test sends, and the actual send-out process in HubSpot.
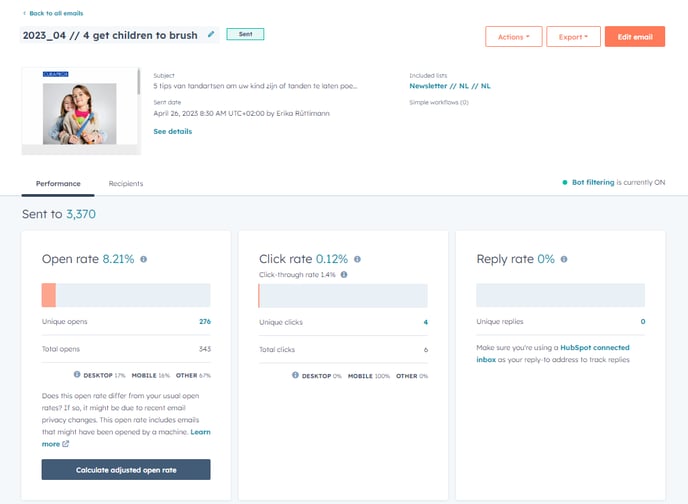
Step 7: Track Performance
To see how a Newsletter has performed – Just go into a Newsletter that has been sent already and choose between “performance” or “recipients”.